Vscode Markdown Shortcut Keys
使用VS Code的Markdown Shortcut插件,可以方便快捷的编辑Markdown文档,并且已经与上下文的菜单集成,右键即可使用。下面将介绍安装和使用。
使用VS Code的Markdown Shortcut插件,可以方便快捷的编辑Markdown文档,并且已经与上下文的菜单集成,右键即可使用。下面将介绍安装和使用。
从这里下载windows的python3.7的tensorflow1.9安装包。
*注: 这个网站的whl文件是非python官方的windows二进制扩展包。
PS C:\Users\Husee\Desktop> pip install .\tensorflow-1.9.0-cp37-cp37m-win_amd64.whl
Looking in indexes: http://mirrors.aliyun.com/pypi/simple
Processing c:\users\husee\desktop\tensorflow-1.9.0-cp37-cp37m-win_amd64.whl
Collecting termcolor>=1.1.0 (from tensorflow==1.9.0)
  Downloading http://mirrors.aliyun.com/pypi/packages/8a/48/a76be51647d0eb9f10e2a4511bf3ffb8cc1e6b14e9e4fab46173aa79f981/termcolor-1.1.0.tar.gz
Requirement already satisfied: setuptools<=39.1.0 in c:\users\husee\appdata\local\programs\python\python37\lib\site-packages (from tensorflow==1.9.0) (39.0.1)
Collecting astor>=0.6.0 (from tensorflow==1.9.0)
  Downloading http://mirrors.aliyun.com/pypi/packages/35/6b/11530768cac581a12952a2aad00e1526b89d242d0b9f59534ef6e6a1752f/astor-0.7.1-py2.py3-none-any.whl
Collecting protobuf>=3.4.0 (from tensorflow==1.9.0)
  Downloading http://mirrors.aliyun.com/pypi/packages/77/78/a7f1ce761e2c738e209857175cd4f90a8562d1bde32868a8cd5290d58926/protobuf-3.6.1-py2.py3-none-any.whl (390kB)
    100% |████████████████████████████████| 399kB 12.8MB/s
Collecting grpcio>=1.8.6 (from tensorflow==1.9.0)
  Downloading http://mirrors.aliyun.com/pypi/packages/b1/0b/f46b579e65e11a1ddb0d2a19f458cac91ed71841fed39322e980fd58be44/grpcio-1.14.1-cp37-cp37m-win_amd64.whl (1.5MB)
    100% |████████████████████████████████| 1.5MB 13.7MB/s
Collecting absl-py>=0.1.6 (from tensorflow==1.9.0)
  Downloading http://mirrors.aliyun.com/pypi/packages/cc/e6/6cc5c834023685dd83a28bdb5c1826d9340111493a447e9a9230269defa8/absl-py-0.4.0.tar.gz (88kB)
    100% |████████████████████████████████| 92kB 13.1MB/s
Collecting tensorboard<1.10.0,>=1.9.0 (from tensorflow==1.9.0)
  Downloading http://mirrors.aliyun.com/pypi/packages/9e/1f/3da43860db614e294a034e42d4be5c8f7f0d2c75dc1c428c541116d8cdab/tensorboard-1.9.0-py3-none-any.whl (3.3MB)
    100% |████████████████████████████████| 3.3MB 25.7MB/s
Requirement already satisfied: wheel>=0.26 in c:\users\husee\appdata\local\programs\python\python37\lib\site-packages (from tensorflow==1.9.0) (0.31.1)
Collecting numpy>=1.13.3 (from tensorflow==1.9.0)
  Downloading http://mirrors.aliyun.com/pypi/packages/90/ca/fac7871a7c7d78beb78d7d9562b8d5bfce9ff316dc6c2a7ac34927895609/numpy-1.15.1-cp37-none-win_amd64.whl (13.5MB)
    100% |████████████████████████████████| 13.5MB 12.6MB/s
Requirement already satisfied: six>=1.10.0 in c:\users\husee\appdata\local\programs\python\python37\lib\site-packages (from tensorflow==1.9.0) (1.11.0)
Collecting gast>=0.2.0 (from tensorflow==1.9.0)
  Downloading http://mirrors.aliyun.com/pypi/packages/5c/78/ff794fcae2ce8aa6323e789d1f8b3b7765f601e7702726f430e814822b96/gast-0.2.0.tar.gz
Collecting werkzeug>=0.11.10 (from tensorboard<1.10.0,>=1.9.0->tensorflow==1.9.0)
  Downloading http://mirrors.aliyun.com/pypi/packages/20/c4/12e3e56473e52375aa29c4764e70d1b8f3efa6682bef8d0aae04fe335243/Werkzeug-0.14.1-py2.py3-none-any.whl (322kB)
    100% |████████████████████████████████| 327kB 34.2MB/s
Collecting markdown>=2.6.8 (from tensorboard<1.10.0,>=1.9.0->tensorflow==1.9.0)
  Downloading http://mirrors.aliyun.com/pypi/packages/6d/7d/488b90f470b96531a3f5788cf12a93332f543dbab13c423a5e7ce96a0493/Markdown-2.6.11-py2.py3-none-any.whl (78kB)
    100% |████████████████████████████████| 81kB 4.8MB/s
Building wheels for collected packages: termcolor, absl-py, gast
  Running setup.py bdist_wheel for termcolor ... done
  Stored in directory: C:\Users\Husee\AppData\Local\pip\Cache\wheels\65\c8\98\8361afe9bafba434b7acf14c08627560d63018272226ff3e10
  Running setup.py bdist_wheel for absl-py ... done
  Stored in directory: C:\Users\Husee\AppData\Local\pip\Cache\wheels\50\6f\41\ae7dbb65f38f6e607b399117e4cb959977e016d12b6166a67f
  Running setup.py bdist_wheel for gast ... done
  Stored in directory: C:\Users\Husee\AppData\Local\pip\Cache\wheels\17\0a\dc\bb6d7b129029482a8d55901d66b65e756a681f6a1da7297a9b
Successfully built termcolor absl-py gast
Installing collected packages: termcolor, astor, protobuf, grpcio, absl-py, numpy, werkzeug, markdown, tensorboard, gast, tensorflow
Successfully installed absl-py-0.4.0 astor-0.7.1 gast-0.2.0 grpcio-1.14.1 markdown-2.6.11 numpy-1.15.1 protobuf-3.6.1 tensorboard-1.9.0 tensorflow-1.9.0 termcolor-1.1.0 werkzeug-0.14.1
PS C:\Users\Husee\Desktop> pip list
Package           Version
----------------- -------
absl-py           0.4.0
astor             0.7.1
astroid           1.6.5
colorama          0.3.9
gast              0.2.0
grpcio            1.14.1
isort             4.3.4
lazy-object-proxy 1.3.1
Markdown          2.6.11
mccabe            0.6.1
numpy             1.15.1
pip               18.0
protobuf          3.6.1
pylint            1.9.2
setuptools        39.0.1
six               1.11.0
tensorboard       1.9.0
tensorflow        1.9.0
termcolor         1.1.0
torch             0.4.1
Werkzeug          0.14.1
wheel             0.31.1
wrapt             1.10.11
PS C:\Users\Husee\Desktop> pip -V
pip 18.0 from c:\users\husee\appdata\local\programs\python\python37\lib\site-packages\pip (python 3.7)
PS C:\Users\Husee\Desktop>
python
Python 3.7.0b5 (v3.7.0b5:abb8802389, May 31 2018, 01:54:01) [MSC v.1913 64 bit (AMD64)] on win32
Type "help", "copyright", "credits" or "license" for more information.
>>> import tensorflow as tf
Traceback (most recent call last):
  File "C:\Users\Husee\AppData\Local\Programs\Python\Python37\lib\site-packages\tensorflow\python\pywrap_tensorflow.py", line 58, in <module>
    from tensorflow.python.pywrap_tensorflow_internal import *
  File "C:\Users\Husee\AppData\Local\Programs\Python\Python37\lib\site-packages\tensorflow\python\pywrap_tensorflow_internal.py", line 35, in <module>
    _pywrap_tensorflow_internal = swig_import_helper()
  File "C:\Users\Husee\AppData\Local\Programs\Python\Python37\lib\site-packages\tensorflow\python\pywrap_tensorflow_internal.py", line 30, in swig_import_helper
    _mod = imp.load_module('_pywrap_tensorflow_internal', fp, pathname, description)
  File "C:\Users\Husee\AppData\Local\Programs\Python\Python37\lib\imp.py", line 243, in load_module
    return load_dynamic(name, filename, file)
  File "C:\Users\Husee\AppData\Local\Programs\Python\Python37\lib\imp.py", line 343, in load_dynamic
    return _load(spec)
ImportError: DLL load failed: 找不到指定的模块。

During handling of the above exception, another exception occurred:

Traceback (most recent call last):
  File "<stdin>", line 1, in <module>
  File "C:\Users\Husee\AppData\Local\Programs\Python\Python37\lib\site-packages\tensorflow\__init__.py", line 22, in <module>
    from tensorflow.python import pywrap_tensorflow  # pylint: disable=unused-import
  File "C:\Users\Husee\AppData\Local\Programs\Python\Python37\lib\site-packages\tensorflow\python\__init__.py", line 49, in <module>
    from tensorflow.python import pywrap_tensorflow
  File "C:\Users\Husee\AppData\Local\Programs\Python\Python37\lib\site-packages\tensorflow\python\pywrap_tensorflow.py", line 74, in <module>
    raise ImportError(msg)
ImportError: Traceback (most recent call last):
  File "C:\Users\Husee\AppData\Local\Programs\Python\Python37\lib\site-packages\tensorflow\python\pywrap_tensorflow.py", line 58, in <module>
    from tensorflow.python.pywrap_tensorflow_internal import *
  File "C:\Users\Husee\AppData\Local\Programs\Python\Python37\lib\site-packages\tensorflow\python\pywrap_tensorflow_internal.py", line 35, in <module>
    _pywrap_tensorflow_internal = swig_import_helper()
  File "C:\Users\Husee\AppData\Local\Programs\Python\Python37\lib\site-packages\tensorflow\python\pywrap_tensorflow_internal.py", line 30, in swig_import_helper
    _mod = imp.load_module('_pywrap_tensorflow_internal', fp, pathname, description)
  File "C:\Users\Husee\AppData\Local\Programs\Python\Python37\lib\imp.py", line 243, in load_module
    return load_dynamic(name, filename, file)
  File "C:\Users\Husee\AppData\Local\Programs\Python\Python37\lib\imp.py", line 343, in load_dynamic
    return _load(spec)
ImportError: DLL load failed: 找不到指定的模块。


Failed to load the native TensorFlow runtime.

See https://www.tensorflow.org/install/install_sources#common_installation_problems

for some common reasons and solutions.  Include the entire stack trace
above this error message when asking for help.
首先检查numpy、scipy、matplotlib、scikit-learn的版本是否更新到最新且符合当前Python版本: 如果出现不是最新的版本,先卸载该版本:(windows+".")pip uninstall numpy 再去http://www.lfd.uci.edu/~gohlke/pythonlibs/ 安装最新版本:(windows+".")pip install numpy
第一性原理告诉我们,我们不但要用工具,还要能自己创造工具,这样才能提升生产力! 创造的工具可以开源,让社区强大和优秀的人一起完善,很多牛X的工具就是这么来的,好的工具总得有人先把概念和第一行代码写出来牵个头,linux 、docker 、Kubernetes、tensorflow 、Git 等等 都是从概念和第一个demo 开始的,然后在社区引起共鸣才发展起来的!从问题本身出发,抛开常理逻辑,不落入俗套(套路),就是第一性原理要表达的意思,其实创新也是这样来的,Elon Mask 那种从0 到 1 的创造力就是来源于第一性原理。
为了能在docker执行的时候加速,采用了--build-arg参数,设定了代理地址
docker build –build-arg HTTP_PROXY=http://192.168.16.254:1080 –build-arg HTTPS_PROXY=http://192.168.16.254:1080 -t jermine/opencv:alpine -f Dockerfile.alpine .
docker build -t jermine/opencv:alpine-arm64-3.4.1 -f Dockerfile.alpine –build-arg HTTP_PROXY=http://192.168.16.254:1080 –build-arg HTTPS_PROXY=http://192.168.16.254:1080 .
export OPENCV_DIR=/opt/opencv
export LIBGPUARRAY_DIR=/opt/libgpuarray
export NUM_CORES=8
export NB_UID=1000
export CLONE_TAG=1.0
export OPENCV_VERSION=3.4.1
export OPENCL_ENABLED=OFF
apt install g++ python3 python3-dev build-essential cmake pkg-config libprotobuf-dev protobuf-compiler libopencv-dev


wget https://bootstrap.pypa.io/get-pip.py

python3 get-pip.py
    -D BUILD_opencv_xfeatures2d=OFF \
    -D BUILD_opencv_world=OFF \

    cmake \
    -D PYTHON_EXECUTABLE=$(which python3) \
    -D WITH_CUDA=OFF \
    -D CMAKE_BUILD_TYPE=RELEASE \
    -D BUILD_PYTHON_SUPPORT=ON \
    -D CMAKE_INSTALL_PREFIX=/usr/local \
    -D INSTALL_C_EXAMPLES=ON \
    -D INSTALL_PYTHON_EXAMPLES=ON \
    -D BUILD_PYTHON_SUPPORT=ON \
    -D BUILD_NEW_PYTHON_SUPPORT=ON \
    -D PYTHON_DEFAULT_EXECUTABLE=$(which python3) \
    -D PYTHON_INCLUDE_DIR=/usr/include/python3.5m \
    -D PYTHON_LIBRARY=/usr/lib/arm-linux-gnueabihf/libpython3.5m.so \
    -D PYTHON3_NUMPY_INCLUDE_DIRS=/usr/lib/python3/dist-packages/numpy/core/include \
    -D OPENCV_EXTRA_MODULES_PATH=$OPENCV_DIR/opencv_contrib-$OPENCV_VERSION/modules \
    -D WITH_TBB=ON \
    -D WITH_PTHREADS_PF=ON \
    -D WITH_OPENNI=OFF \
    -D WITH_OPENNI2=ON \
    -D WITH_EIGEN=ON \
    -D BUILD_DOCS=ON \
    -D BUILD_TESTS=ON \
    -D BUILD_PERF_TESTS=ON \
    -D BUILD_EXAMPLES=ON \
    -D WITH_OPENCL=$OPENCL_ENABLED \
    -D USE_GStreamer=ON \
    -D WITH_GDAL=ON \
    -D WITH_CSTRIPES=ON \
    -D ENABLE_FAST_MATH=1 \
    -D WITH_OPENGL=ON \
    -D WITH_QT=OFF \
    -D WITH_IPP=ON \
    -D WITH_FFMPEG=ON \
    -D WITH_V4L=ON .. && \
    make -j4 && \
    make install && \
    ldconfig && \
什么是 defer?如何理解 defer 关键字?Go 中使用 defer 的一些坑。
defer 意为延迟,在 golang 中用于延迟执行一个函数。它可以帮助我们处理容易忽略的问题,如资源释放、连接关闭等。但在实际使用过程中,有一些需要注意的地方(坑),下面我们一一道来。
apt install socat ebtables ethtool
主要软件有:
kubeadm_1.10.2-00_arm64 、kubectl_1.10.2-00_arm64 、kubelet_1.10.2-00_arm64 、kubernetes-cni_0.6.0-00_arm64
按如下步骤进行安装:
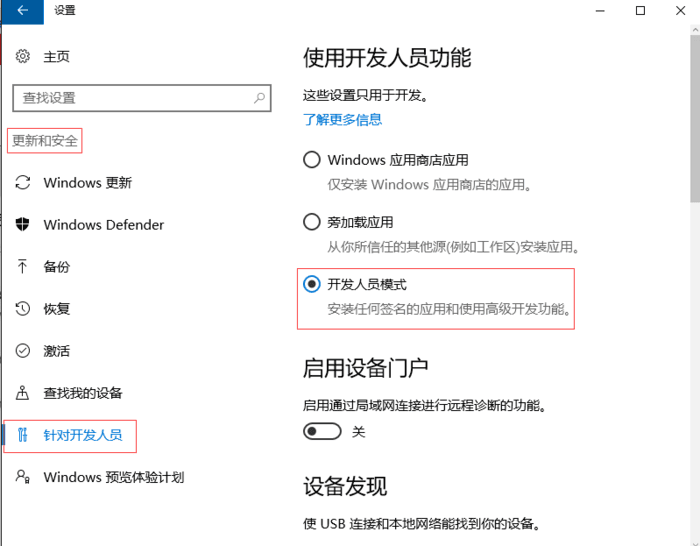
系统升级到一周年正式版及以上(1607)
依次在 设置 - 更新与安全 - 针对开发人员 选项中,启用"开发人员模式"
最近在学习虚拟化相关的知识,遇到远程桌面协议,就简单整理了下找到的资料,目前常用的协议有VNC/SPICE/RDP三种,就在这里做一个简单的介绍。
docker run --runtime=nvidia --restart=always --name tensorflow -dit -v `pwd`:/app -w /app nvidia/cuda:9.0-cudnn7-runtime-ubuntu16.04
docker exec -it tensorflow bash
Jermine@ubuntu:~$ cat > /etc/apt/sources.list

deb http://mirrors.aliyun.com/ubuntu/ xenial main restricted universe multiverse
deb http://mirrors.aliyun.com/ubuntu/ xenial-security main restricted universe multiverse
deb http://mirrors.aliyun.com/ubuntu/ xenial-updates main restricted universe multiverse
deb http://mirrors.aliyun.com/ubuntu/ xenial-backports main restricted universe multiverse
##测试版源
deb http://mirrors.aliyun.com/ubuntu/ xenial-proposed main restricted universe multiverse
sudo apt-get update
# 导入环境变量
 TENSORFLOW_VERSION=1.7.0

 apt-get update -y  && apt-get install -y --no-install-recommends python3 python3-pip  protobuf-compiler;\
    pip3 install --upgrade pip ;\
    python3 -V && pip3 -V ;\
    pip3  --no-cache-dir install setuptools  ;\
    pip3 --no-cache-dir install  \
    https://storage.googleapis.com/tensorflow/linux/gpu/tensorflow_gpu-${TENSORFLOW_VERSION}-cp35-cp35m-linux_x86_64.whl ;\
    apt-get autoremove && apt-get autoclean ;\
    rm -rf /var/lib/apt/lists/*
import numpy as np
np.random.seed(0)
import tensorflow as tf
import time

N,D = 6000,8000

with tf.device('/cpu:0'):
    x = tf.placeholder(tf.float32)
    y = tf.placeholder(tf.float32)
    z = tf.placeholder(tf.float32)

    a = x * y
    b = a + z
    c = tf.reduce_sum(b)

grad_x, grad_y, grad_z = tf.gradients(c, [x,y,z])

start_time = time.time()
with tf.Session() as sess:
    values = {
        x: np.random.randn(N, D),
        y: np.random.randn(N, D),
        z: np.random.randn(N, D),
    }
    out = sess.run([c, grad_x, grad_y, grad_z],
                   feed_dict=values)
    c_val, grad_x_val, grad_y_val, grad_z_val = out
elapsed = time.time() - start_time
print(time.strftime("%H:%M:%S", time.gmtime(elapsed)))
print("exit 0")
将其存为 test_gpu_for_tensorflow.py , 使用 python3 test_gpu_for_tensorflow.py 执行结果如下:
root@raspi:/home/pi# cat > /etc/apt/sources.list
deb http://mirrors.ustc.edu.cn/raspbian/raspbian/ stretch main contrib non-free rpi
#deb-src http://mirrors.ustc.edu.cn/raspbian/raspbian/ stretch main contrib non-free rpi
然后执行
sudo apt update