Jenkins 中使用 Buildah Push 推送镜像的三种认证方式
在 Jenkins 容器中使用 buildah push 推送镜像时,设置登录认证主要有三种方式。将凭证硬编码在命令里会带来严重的安全风险,因此在实际的 CI/CD 实践中,更推荐采用"登录 (Login) + 配置文件 (Authfile)“的方式。
在 Jenkins 容器中使用 buildah push 推送镜像时,设置登录认证主要有三种方式。将凭证硬编码在命令里会带来严重的安全风险,因此在实际的 CI/CD 实践中,更推荐采用"登录 (Login) + 配置文件 (Authfile)“的方式。
在 Kubernetes 集群中,很多时候服务没有对外暴露的网络入口,排查问题或日常运维都需要进入集群内部。通常的做法是:
本文介绍如何在 K8s 中用一个 Pod 两个容器实现 SSH 跳板机 + autossh 自动隧道,实现稳定的内网穿透。
在内网环境中,经常需要将本地服务暴露到远程服务器上,常见场景如:
使用 SSH 反向隧道(-R 参数)可以将本地端口映射到远程服务器端口,而 autossh 则能自动保持 SSH 连接稳定,在断线时自动重连。
harbor的官方安装指南介绍了harbor有三种安装方式,分别是在线安装、离线安装和OVA安装,本文主要采用离线安装的方式。
官方文档上面说明需要依赖Python 2.7或以上版本,Docker引擎1.10以上,还有Docker Compose 1.6.0或以上版本,openssl。
先介绍 非安全 的连接方式。
CoreOS 请使用第二种方法,其他 Linux 系统配置时选择以下两种方法之一
docker.service 中 dockerd 的 -H 参数不能与 daemon.json 中的 hosts 键值对冲突。(其他参数同理)
新建 /etc/systemd/system/docker.service.d/docker.conf 文件。
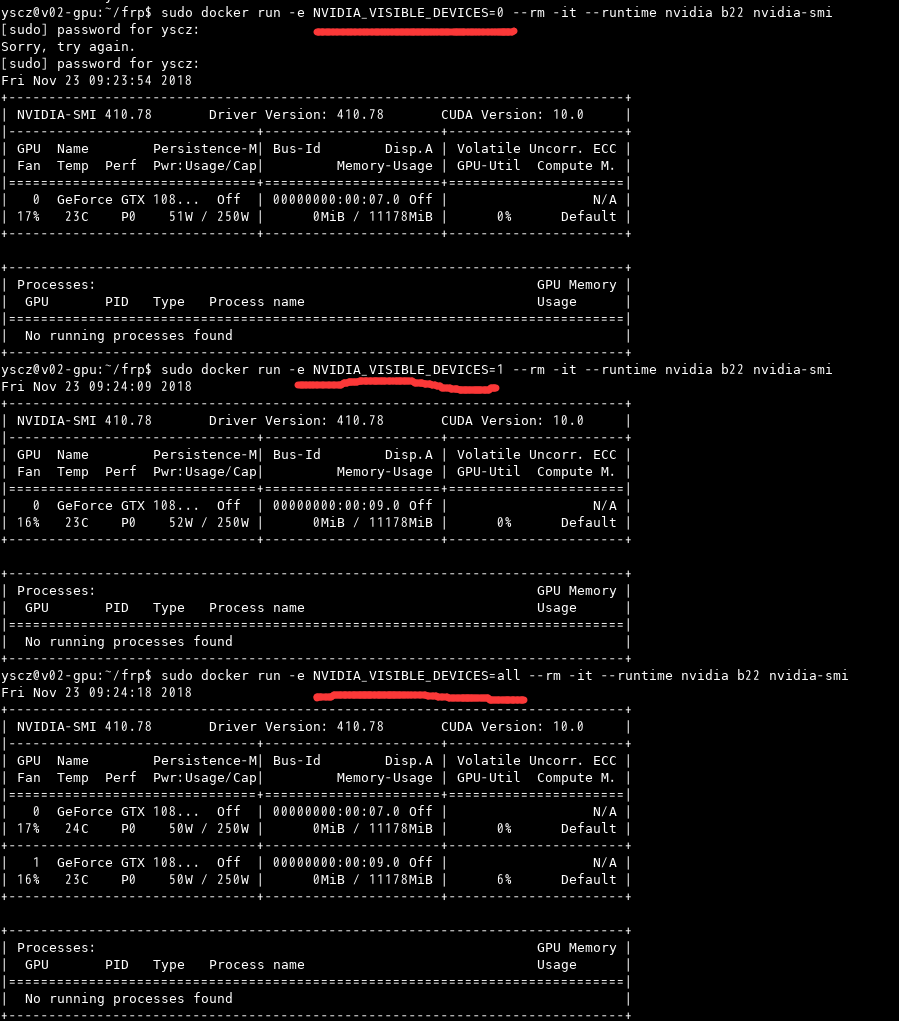
docker调用GPU时可以明确指定用哪一张显卡,同时也可以指定数量
docker run --runtime=nvidia --restart=always --name tensorflow -dit -v `pwd`:/app -w /app nvidia/cuda:9.0-cudnn7-runtime-ubuntu16.04
docker exec -it tensorflow bash
Jermine@ubuntu:~$ cat > /etc/apt/sources.list

deb http://mirrors.aliyun.com/ubuntu/ xenial main restricted universe multiverse
deb http://mirrors.aliyun.com/ubuntu/ xenial-security main restricted universe multiverse
deb http://mirrors.aliyun.com/ubuntu/ xenial-updates main restricted universe multiverse
deb http://mirrors.aliyun.com/ubuntu/ xenial-backports main restricted universe multiverse
##测试版源
deb http://mirrors.aliyun.com/ubuntu/ xenial-proposed main restricted universe multiverse
sudo apt-get update
# 导入环境变量
 TENSORFLOW_VERSION=1.7.0

 apt-get update -y  && apt-get install -y --no-install-recommends python3 python3-pip  protobuf-compiler;\
    pip3 install --upgrade pip ;\
    python3 -V && pip3 -V ;\
    pip3  --no-cache-dir install setuptools  ;\
    pip3 --no-cache-dir install  \
    https://storage.googleapis.com/tensorflow/linux/gpu/tensorflow_gpu-${TENSORFLOW_VERSION}-cp35-cp35m-linux_x86_64.whl ;\
    apt-get autoremove && apt-get autoclean ;\
    rm -rf /var/lib/apt/lists/*
import numpy as np
np.random.seed(0)
import tensorflow as tf
import time

N,D = 6000,8000

with tf.device('/cpu:0'):
    x = tf.placeholder(tf.float32)
    y = tf.placeholder(tf.float32)
    z = tf.placeholder(tf.float32)

    a = x * y
    b = a + z
    c = tf.reduce_sum(b)

grad_x, grad_y, grad_z = tf.gradients(c, [x,y,z])

start_time = time.time()
with tf.Session() as sess:
    values = {
        x: np.random.randn(N, D),
        y: np.random.randn(N, D),
        z: np.random.randn(N, D),
    }
    out = sess.run([c, grad_x, grad_y, grad_z],
                   feed_dict=values)
    c_val, grad_x_val, grad_y_val, grad_z_val = out
elapsed = time.time() - start_time
print(time.strftime("%H:%M:%S", time.gmtime(elapsed)))
print("exit 0")
将其存为 test_gpu_for_tensorflow.py , 使用 python3 test_gpu_for_tensorflow.py 执行结果如下:
x509: certificate signed by unknown authority This error message means that you do not have a trusted certificate. You need to trust the default certificates generated during your Docker Trusted Registry (DTR) installation.
You can do so by running these commands on the nodes from where you want to access your DTR (be sure to replace
CentOS/RHEL
export DOMAIN_NAME=hub.fi.vdo.pub
export TCP_PORT=443
openssl s_client -connect $DOMAIN_NAME:$TCP_PORT -showcerts </dev/null 2>/dev/null | openssl x509 -outform PEM | sudo tee /etc/pki/ca-trust/source/anchors/$DOMAIN_NAME.crt
update-ca-trust
systemctl restart docker.service
Ubuntu
安全计算模式(secure computing mode,seccomp)是 Linux 内核功能,可以使用它来限制容器内可用的操作。
Docker 的默认 seccomp 配置文件是一个白名单,它指定了允许的调用。
要是想把容器的权限与宿主主机的用户权限一致的话,则只需要把用户和组文件映射到容器里面即可:
docker run --restart=always -d --name samba -p 139:139 -p 445:445 -v /data/samba_server:/share -v /etc/passwd:/etc/passwd:ro -v /etc/group:/etc/group:ro dperson/samba -s "lnh;/share/;yes;no;no;all;none"
如果只是设置账户直接访问可以直接run: